I am obsessed with this super easy berry tart recipe for many reasons. First, it’s loaded with juicy berry flavors that have been balanced with a more neutral crust.
Secondly, the combination of juicy and crunchy textures is out of this world. And finally, who doesn’t love a colorful and easy-to-make dessert that can be made in advance?

If you aren’t convinced yet, just wait until you read the variations and serving options that elevate this tart to the next level!
Give it a try with my Portuguese custard tarts or this unique Strawberry pop tart.
Berry Tart Shell and Filling Ingredients – What You Will Need
Tart Shell
- All- purpose flour
- Dark brown sugar
- Unsalted butter
- Egg yolk
- Salt
- Cold milk
- Agave syrup
- Molasses
Filling and Topping
- Mix of frozen berries (strawberry, cranberry, blueberry)
- Light brown sugar
- Vanilla extract
- Cinnamon
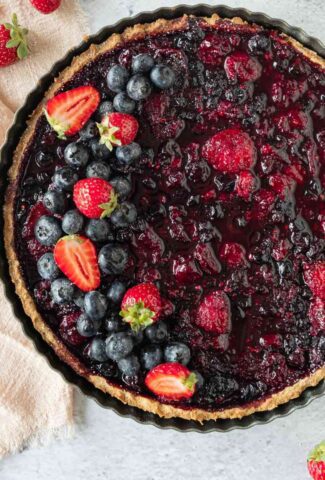
- Fresh berries for serving

How To Blind Bake A Tart Crust Like A Pro!
Blind baking, more commonly referred to as “pre-baking” is a common preparation technique used when baking a pastry crust, especially a buttery crust.
First, let me explain how you blind bake.
- Once you have lined your pie dish with your dough, remove any excess dough from the rim of the tart pan. Then, gently press the fluted edges so the dough rises slightly above the tart pan edge. This helps prevent excessive shrinkage – DO NOT SKIP THEM STEP.
- Next, you can dock the tart shell with a fork. This helps prevent bubbling AND makes the crust make more evenly.
- Cut a large piece of parchment paper that’s bigger than your tart pan. Crumble it up, then open it back up and fit it into your tart crust. Make sure it fits the shape as closely as possible.
- Add dried beans, dried rice, pie weights, or blind baking beans (ceramic or marble balls) on the parchment paper. Make sure they are evenly spread. These help prevent bubbling and promote gradual even baking.
- Partially bake the tart crust for the recommended time. Once pre-baked, remove it from the oven and allow it to cool completely. When you add the hot berry filling, the cooled crust won’t absorb the juices and become soggy.

The Importance Of Blind-Baking The Tart Crust
As you can see from the comprehensive explanation above, there are many reasons you should pre-bake your crust.
- First, it helps the crust bake more evenly.
- Secondly, it prevents excessive shrinkage so that you still have a beautiful-looking crust.
- Pre-baking also helps prevent a bubbling crust which could crack and let berry juices leech out the bottom.
- And finally, it prevents the crust from becoming soggy when the berry filling has been added.

How To Make My Easy Berry Tart Recipe – A Step-By-Step Guide
- For the crust:
• Mix flour, sugar, and salt in a bowl.
• Cut in butter until crumbly.
• Add milk, egg yolk, agave syrup, and molasses, knead into a soft dough.
• Shape into a ball, wrap, and refrigerate for 30 minutes.
• Preheat oven to 350F.
• Roll out dough, line tart tin, poke holes, pre bake for 10 minutes.

- Prepare the filling and Assemble the tart:
• Combine cinnamon, brown sugar, and frozen berries in a bowl
• Spread berries over the pre-baked crust.
• Bake at 325F for 35-40 minutes until golden.
• Cool before serving.
• Decorate with fresh berries and serve with ice cream if desired.

Variations For My Berry Tart
The recipe I used to make my tart crust is by no means as simple as making a graham cracker crust. However, it’s a fantastic recipe that creates a beautifully golden brown crispy crust.
If you want to, you can use fine almond flour to make the crust gluten-free.
To make the crust vegan, replace the egg with a fake egg (I like using flax seed eggs), the unsalted butter with vegan margarine, and the milk with a plant-based substitute.

Adding A Creamy Custard (Vanilla Pastry Cream)
I deliberately avoided making a fruit tart with a pastry cream filling, however, I can’t deny its deliciousness! Especially if you are making a fresh fruit tart!
There are many kinds of pastry cream options out there from a vanilla custard (which is super thick) to an anglaise (which is a thinner pastry cream). No matter which you choose, always try to use high-quality vanilla extract or real vanilla bean pods.
Using Fresh Berries
This berry tart uses frozen berries mainly because finding seasonal berries can be challenging.
If you are in spring or summer and can find fresh berries, go for it! I love using a mix of fresh strawberries, blueberries, and fresh raspberries.

How To Serve Your Freshly Baked Berry Tart
This berry tart is already stuffed with juicy summer flavors and crunchy textures – it’s perfect as-is.
But if you really want to add something extra, I would suggest you go simple.
You can dust the berry tart with powdered sugar right before serving to give it an elegant finish. I also like using fresh mint leaves for a pop of color.
As mentioned before, vanilla custard is a fantastic accompaniment and may even help break the sweetness of the mixed berries.
And finally, you cannot go wrong with vanilla ice cream or whipped cream. You can even make sweetened whipped cream with powdered sugar and vanilla extract.

How To Store Leftover Berry Tart?
If you are lucky enough to have leftover fruit tart, it’s best to keep it inside the tart pan for storage.
Leave the berry tart to cool completely on a wire rack before wrapping it (inside the tart pan) with plastic wrap. You can place the pan inside a big airtight container for extra protection.
Store the berry tart in the fridge for 3-4 days, but keep in mind the crust will lose its crispy texture, and re-crisping the dough is next to impossible.
Here’s a pro tip: use a pastry brush to cover the berries with apricot jam or an apricot glaze (thinner jam). This helps preserve the fruits, extending the shelf life of the berry tart. Plus, it adds a beautiful, shiny glaze to the irresistible berries.

Tips And Tricks for Making A Fruit Tart And Tart Crust
- Always use room-temperature ingredients when making fruit tarts. This goes for the crust as well as the berry filling. This helps the ingredients bind together better to create a more uniform mixture – which is especially important for this dough.
- Do not cream the butter and flour mixture together. This will create a texture that isn’t very flaky or crunchy. Make sure to cut the butter into the flour so small pea-sized crumbs form. This will help the fat distribute more evenly.
- Resting the tart dough is also extremely important for many reasons. First, it allows the gluten in the dough to relax, creating a softer crust. Secondly, it prevents overworking the dough, which often leads to a dense, chewy texture. And finally, resting your dough helps make it chill. This is important because once the dough is inside the tart pan, it will reduce shrinkage when it’s being baked.

FAQs On This Mixed Berry Tart Recipe
Can I use a different type of crust?
You can use a pre-made crust, but make sure it’s a crumbly tart crust, not a graham cracker crust. You can also change the dough recipe to make a gluten-free or vegan dough.
How Long Are Berry Tarts Good For?
You can store your berry tart in the fridge for up to 5 days. It lasts quite long because there aren’t any highly perishable ingredients that haven’t been preserved (the tart crust and berry filling have been cooked). If you store it for longer than that, make sure to keep an eye out for bacterial growth.
MIXED BERRY TART
Ingredients
Crust Ingredients:
- 1½ cups all-purpose flour
- ¼ cup darkbrown sugar
- ½ cup unsalted butter, plus1tbsp butter for spreading chilled and cubed
- 1 large egg yolk
- 2 Tbsp ice water
- ¼ tsp salt
- ⅓ cup old milk
- 1 Tbsp agave syrup
- ½ Tbsp molasses
Filling Ingredients:
- 3 cups Fresh or frozen mixed berries (such as strawberries, blueberries, and raspberries)
- ⅓ cup light brown sugar
- 1 tsp vanilla extract
Serving:
- fresh berries for serving
Instructions
For the Crust
- In a food processor, pulse together the flour, dark brown sugar, and salt until combined. Add the chilled butter cubes and pulse until the mixture resembles coarse crumbs.
- In a small bowl, whisk together the egg yolk, cold milk, ice water, agave syrup, and molasses. With the food processor running, gradually add the egg yolk mixture until the dough comes together and forms a ball.
- Turn the dough out onto a lightly floured surface and knead it briefly until smooth. Flatten the dough into a disk, wrap it in plastic wrap, and refrigerate for at least 30 minutes.
- Preheat the oven to 375°F (190°C).
- Roll out the chilled dough on a lightly floured surface to fit a 9-inch tart pan. Carefully transfer the dough to the tart pan, pressing it into the bottom and sides. Trim any excess dough.
- Prick the bottom of the crust with a fork, line it with parchment paper, and fill it with pie weights or dried beans.
- Pre-bake the crust in the preheated oven for 10 minutes at 375°F (190°C).
- Then, remove the parchment paper and pie weights, and bake for an additional 5 minutes, or until the edges are lightly golden.
Filling
- In the meantime, prepare the berry filling. In a large bowl, toss together the mixed berries, light brown sugar, and vanilla extract until well combined. Let the mixture sit for about 10 minutes to allow the berries to release their juices.
- Remove the tart shell from the oven and let it cool slightly. Fill the pre-baked tart shell with the prepared berry filling, spreading it out evenly.
- Return the filled tart to the oven and bake for an additional15-20 minutes, or until the filling is bubbly and the crust is golden brown.
- Allow the tart to cool completely before serving. Optionally, dust with powdered sugar before serving and serve with fresh berries on top.
This berry tart was so delicious and impressive. I’ll definitely be making it again!